Vault 3 Installation
Windows (Intel/AMD 64-bit)
Step 1: Install Vault 3
- Download Vault 3 for Windows (Intel/AMD 64-bit).
- Unzip the file and run the "Vault 3 Setup.exe" program.
Step 2: Run Vault 3
Double-click the desktop shortcut to launch Vault 3, or run it from the Start menu.
Vault 3 listens to a TCP/IP socket in order to ensure that only one instance of the program runs. If you have Windows Firewall enabled you'll see the following warning message. Click Unblock.

Step 3: If you have Multiple Monitors
If you are running with multiple monitors, and they do not all have the same resolution, read this.
Windows (ARM 64-bit)
- Download "Vault 3 for Windows (ARM 64-bit)".
- Unzip the "Vault3Win_aarch_64.zip" file.
- Copy the folder contents to a folder named "C:\Program Files\Vault 3".
- Create a desktop shortcut (right-click the Desktop, select New / Shortcut).
- In the "location" textbox enter the following, exactly, including the double-quotes: "C:\Program Files\Vault 3\custom-runtime\bin\javaw.exe" -DConfigPath="%AppData%\Vault 3" -jar "C:\Program Files\Vault 3\vault3.jar" --enable-native-access=ALL-UNNAMED
- Name the shortcut "Vault 3".
- After creating the shortcut, right-click it. Select "Properties". Click "Change Icon". Browse to the "C:\Program Files\Vault 3" folder. Select the "vault3.ico" file. Hit OK twice.
Double-click the desktop shortcut to run Vault 3. You can also right-click the shortcut and drag it to the taskbar for one-click launching.
Linux (Intel/AMD 64-bit)
Step 1: Install Vault 3
Note: in the instructions below, replace "{install folder}" with the path of the folder containing the Vault 3 app. Replace "{settings folder}" with a path to a folder in which Vault 3's configuration settings will be stored.
For example, on my Linux system I use the following paths:
| Path | |
|---|---|
| {install folder} | /home/eric/Apps/Vault3LinuxGTK_x86_64 |
| {settings folder} | /home/eric/Apps/Vault3Settings |
- Download Vault 3 for Linux (Intel/AMD 64-bit).
- Unzip the file to a hard disc folder.
- You will need to specify that the "java" file in the "custom-runtime" folder is executable.
In a command shell, "cd" to the folder in which you installed Vault 3 and execute the following command:chmod +x custom-runtime/bin/java
You can also use the "Files" app to make the "java" file executable (see below). - Right-click the Linux Desktop.
- Select Create Launcher.
- Enter "Vault 3" in the Name text box.
- Enter the following in the Command text box: "{install folder}/custom-runtime/bin/java" -DConfigPath="{settings folder}" -jar "{install folder}/vault3.jar" --enable-native-access=ALL-UNNAMED
Be sure to replace "{install folder}" and "{settings folder}" with the paths you created on your system. - Click Close.
Step 2: Run Vault 3
Double-click the Vault 3 launcher.
Linux (ARM 64-bit)
Step 1: Install Vault 3
Note: in the instructions below, replace "{install folder}" with the path of the folder containing the Vault 3 app. Replace "{settings folder}" with a path to a folder in which Vault 3's configuration settings will be stored.
For example, on my Linux system I use the following paths:
| Path | |
|---|---|
| {install folder} | /home/eric/Apps/Vault3LinuxGTK_aarch_64 |
| {settings folder} | /home/eric/Apps/Vault3Settings |
- Download Vault 3 for Linux (ARM 64-bit).
- Unzip the file to a hard disc folder.
- You will need to specify that the "java" file in the "custom-runtime" folder is executable.
In a command shell, "cd" to the folder in which you installed Vault 3 and execute the following command:chmod +x custom-runtime/bin/java
You can also use the "Files" app to make the "java" file executable (see below). - Right-click the Linux Desktop.
- Select Create Launcher.
- Enter "Vault 3" in the Name text box.
- Enter the following in the Command text box: "{install folder}/custom-runtime/bin/java" -DConfigPath="{settings folder}" -jar "{install folder}/vault3.jar" --enable-native-access=ALL-UNNAMED
Be sure to replace "{install folder}" and "{settings folder}" with the paths you created on your system. - Click Close.
Step 2: Run Vault 3
Double-click the Vault 3 launcher.
Make the "java" File Executable with the Linux Files (File Manager) App
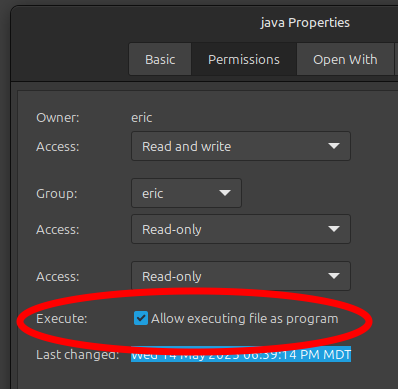
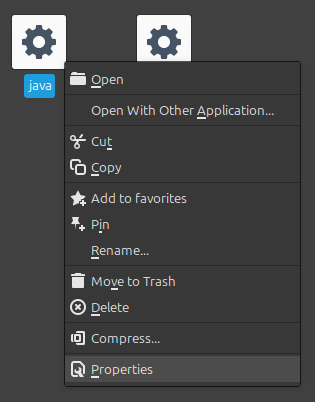
Using the Files app, navigate to the custom-runtime/bin folder. Right-click the "java" file and click "Properties":
Check the "Allow executing file as program" checkbox: